Table of Contents
Horizon EM Mobile Getting Started Guide
| PLEASE NOTE - This is a public document. Any edits/updates to the document should not be specific to any particular site or installation. All edits/updates should apply to the system in general and be of possible benefit to all users. Information pertaining to specific sites should be added to the client site info pages for the site in question |
|---|
| To ask questions, add comments or make suggestions about this guide please go to the related discussion section by clicking on the link at the top of this page. |
|---|
Welcome to the Horizon EM Mobile Getting Started Guide. The purpose of this preliminary guide is to familiarize new users with the basic features of the system. This guide is intended to bring you up to speed on how to use the system for simple call response and unit tracking functions. This system is designed to be simple and easy to use in a mobile environment. In most cases it will be accessed through a touch screen system so the functions outlined below can be accessed simply by touching on the appropriate part of the mobile computer screen.
The EM Mobile system is intended for use in conjunction with the Horizon EME CAD system. All information tracked by the CAD will appear in real-time on the EM Mobile screen. As well all information (unit status times, event notes, system messages to dispatch, etc.) will appear in real-time on the CAD workstations in the dispatch center as well as on all other EM Mobile screens in all other active units.
All requests and actions performed by the mobile system are routed to the main CAD server for validation before being changed on the mobile screen. If you change your status or enter a note on an event your system will be updated and show that change only after the main system as received your request and validated it. This way you will know that the information you are sending and receiving has been processed by the main system in the dispatch center and is available to the dispatchers and other mobile users.
Section I – System Access and Layout
Logging In
To Log-On to the EM Mobile Double-click on the EM Mobile shortcut on your screen. The EM Mobile interface will then load.
To Log-Off the EM Mobile Click on the X in the upper right hand corner of the EM Mobile display.
System Display
Tabs
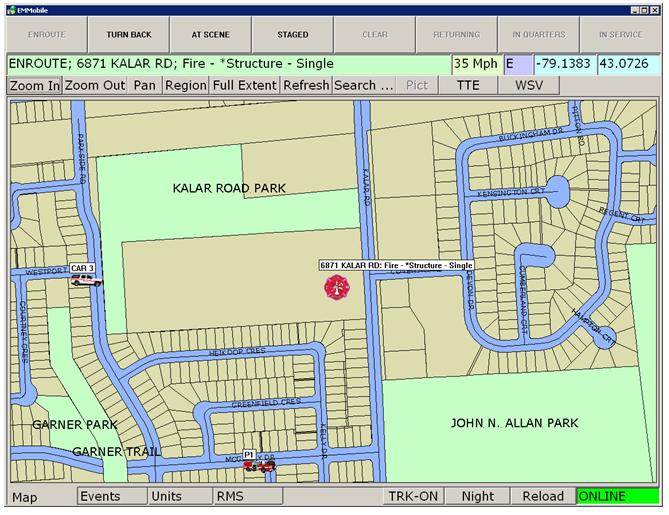
The EM Mobile uses Tabs to organize information for quick and easy access. The Tabs are located on the bottom left section of the interface, and read MAP, EVENTS, UNITS, RMS.
Displays and Functions
Each tab contains different DISPLAYS and FUNCTIONS. A Display is just that – the way in which information is displayed. An example is the Map display in the Map tab. Functions let you manipulate the data. An example is the ZOOM button in the Map Tab. Some of the displays and functions that are available can change, based on what tab you are currently viewing.
System Message Display
This display tells you the status of the system. Common messages include QUEUEING and LOADING, which indicates that the system is active and loading information. Two others are ONLINE and OFFLINE, which indicate if the EM Mobile is currently connected via wireless network to the CAD or not. This is important, as it will alert you as to whether information is being updated. When the display turns yellow, it indicates that there has been in a pause in communications between the central system and the EM Mobile, due to the wireless network that connects them.
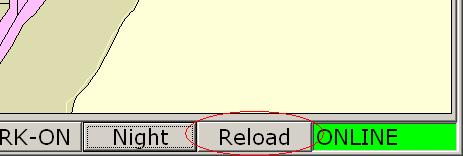
Reload Button
This is located on the lower right corner of the interface. This is used when the System Message Display (see above) detects a pause in the communication with the CAD, due to the wireless network that connects them (indicated by the display turning yellow).
Pressing the Reload button lets you manually query the CAD at that moment, thereby giving you the latest information available. While you will only be able to see the information for the Tab you have selected, the Reload function refreshes the information for ALL tabs. At this point you can hit the Reload button to re-start the application and attempt to restart communications with the central server.
Status Buttons
The status buttons are displayed across the top of the Interface, enable you to update and change the status remotely from the vehicle. This dramatically reduces the amount of time dispatchers need to spend on a call and on the radio as the vehicles are able to manage themselves in this regard.
The Status Buttons labels are specific to your Department, based on your operating procedures. They may also appear with their labels abbreviated, depending on the choice of the Department. They are visible no matter what tab has been selected.
At any given time only certain Status Buttons will be available to you, based on your current status. Available Status Buttons will display in black, while unavailable ones will be grayed out.
The current status of the vehicle will be displayed at all times in the upper left hand corner of the interface, just below the Status Buttons.
To change/update your vehicle’s status, simply press the appropriate available Status Button.
Section II – Map Tab and Functions
What the Map Does
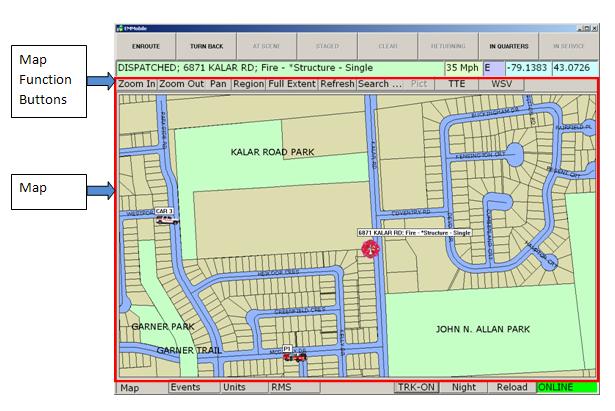
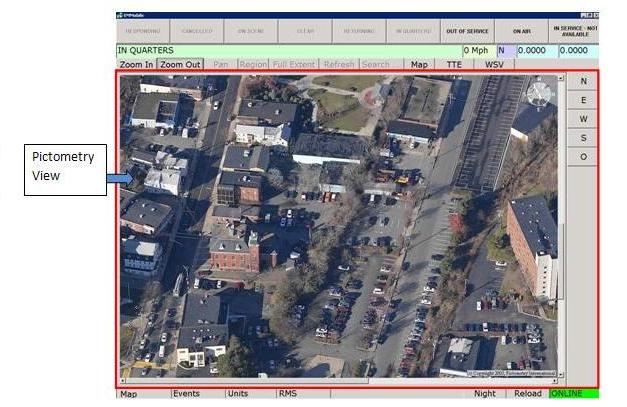
The map screen displays all the important geographical features related to the call – incident location, road networks, street names and numbers, building footprints, and any other important info.
The Map and GPS
If vehicles have GPS capability onboard, their location will be displayed in real time, along with their call sign or designator.
Map Functions
These are functions that are specific to the map tab. They allow you to navigate the map more easily, and keep better track of where incidents and personnel are located. The Map functions are:
- Zoom In: Magnifies the map. Press this button, then press or click the area of the map which you wish to magnify.
- Zoom Out: De-magnifies the map. Press this button, then press or click the area of the map which you wish to zoom out from.
- Pan: Lets you move the area of the map in the view. Press this button, then pres or click on the map and drag it in the direction you wish.
- Select Region: Lets you draw a box around an area on the map and zoom in on it. Press this button, then use the mouse or your finger to draw a rectangle around the area of the map you wish to zoom in to.
- Full Extent: Zooms the map out to its full extent. Simply press this button and the map will expand out, showing the whole area or jurisdiction.
- Refresh: This will clear certain selected items from the maps (such as hydrants) that were selected for display by the user.
- TTE: This is short for Track to Event. Pressing this button zooms the map to the degree necessary to keep the selected incident and selected unit on the map screen at all times. As the vehicle gets closer, the zoom increases.
- WSV: This is short for Windshield View. Pressing this button activates or deactivates the windshield view whereby the view on the map is rotated so it is the same as what is pointing directly straight in front of the vehicle (or out through the windshield). As the vehicle turns the map will rotate to keep the top part of the map aligned with what is directly in front of the vehicle.
Section III –Events Tab and Functions
What the Events Tab Does
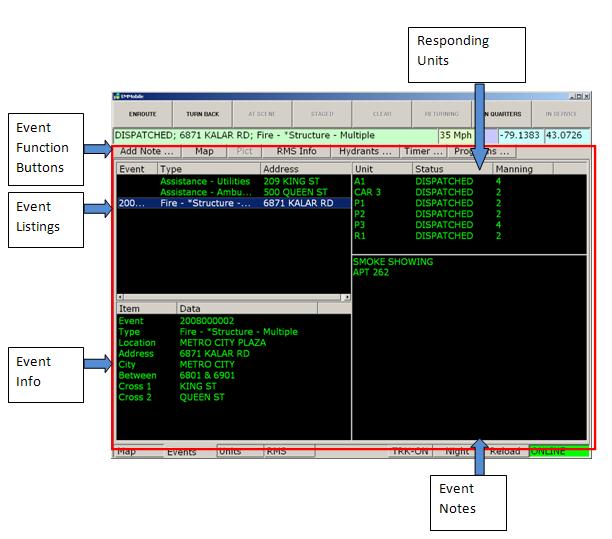
This is the main event information screen where the responding units are able to see - in real time - event information as it is added and updated by the CAD operators.
Events Tab Display
The top left window lists all the active calls, along with incident type and address. Once a call is selected, the window directly below populates with the main address information, to make locating the incident simpler.
The top right window is a list of vehicles responding to the selected call, along with their status and manning.
In the bottom right window are the event notes that are associated with the selected call.
Events Tab Functions
- Add Note: Pressing this button lets you add an event note to the selected call via the keyboard. This information will be instantly updated back to the CAD, and to other EM Mobile-enabled vehicles.
- Map: Pressing this button takes you back to the Map Tab, but centered on the location of the selected call.
- RMS Info: Pressing this button takes you to the RMS Info Tab, with available RMS information for the selected call filled in.
Section IV –Units Tab and Functions
What the Units Tab Does
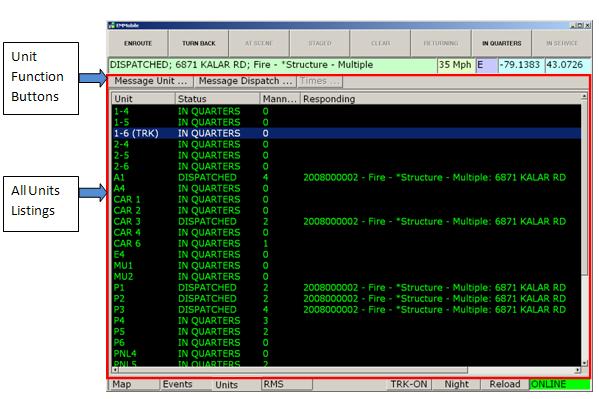
This is the main unit information screen. Here all the active units for your department are listed by call sign/designator, as well as their status, manning and current assignment.
Units Tab Functions
- Send Message to Unit: Pressing this button lets you type a message that will JUST be sent to the selected Unit.
- Send Message to Dispatch: Pressing this button lets you type a message that will be JUST be sent back to the central dispatch center.
- Track: Pressing this button lets you track the selected vehicle’s real time location via GPS. This means that the tracked vehicle will be “followed” on the map screen, making sure it is always in view. Most units set tracking on themselves, so they can easily track their own progress when responding to a call.
Section V – RMS Tab and Functions
What the RMS Tab Does
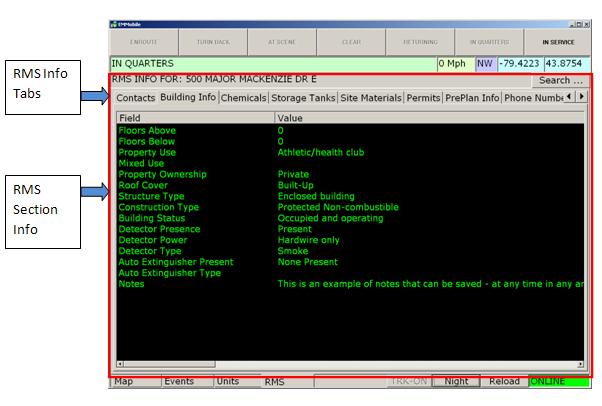
This gives you instant access to data stored in the Record Management System regarding the incident location for the incident selected in Events Tab.
RMS Tab Display
The RMS Tab is divided into a number of tabbed windows, each of which contains different information about the location of the call. The actual tabbed window headers are customizable by the department, and can pull any data contained in the RMS.
RMS Tab Functions
Selecting a call in the Units Tab and then selecting any of the tabbed windows in the RMS Tab will populate the data for that particular incident.
